Lab 3.2 – Configure Object Attributes for Historization
Configure Object Attributes for Historization
After the Engine
object has been enabled for historization, attributes in the hosted objects can
be historized. In the next steps, you will configure several attributes from
different objects to be historized.
Step 21.In the Template Toolbox,
expand the Project toolset, and double-click the $Tank object to open its editor.
Step 22. In the Field Attributes tab,
in the Field attributes list, select LT.PV.
Configure Object Attributes for Historization
After the Engine object has been enabled for historization, attributes in the hosted objects can be historized. In the next steps, you will configure several attributes from different objects to be historized.
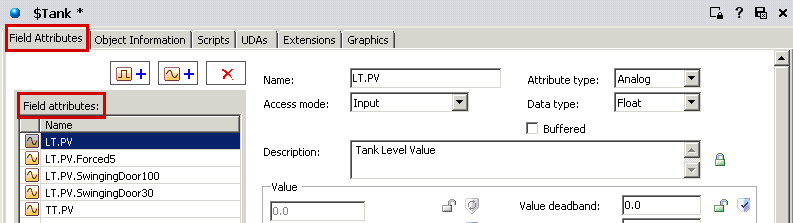
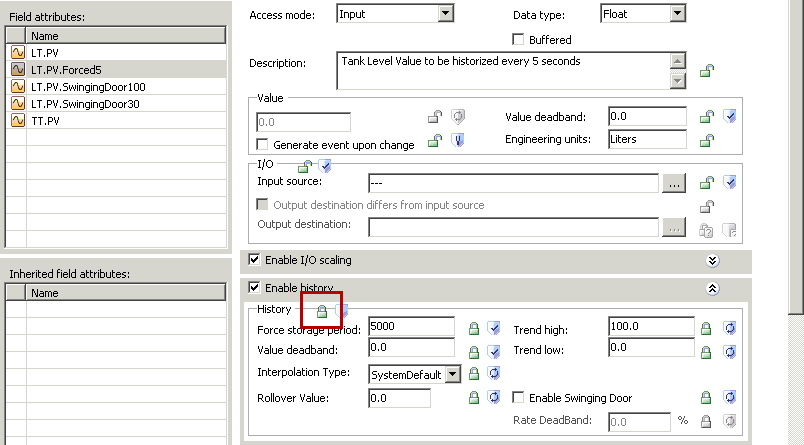
Step 21.In the Template Toolbox, expand the Project toolset, and double-click the $Tank object to open its editor.
Step 22. In the Field Attributes tab, in the Field attributes list, select LT.PV.
Step 23. In the right pane,
check the option to Enable History. The History area attributes are displayed
Step 23. In the right pane,
check the option to Enable History. The History area attributes are displayed
Step 23. In the right pane,
check the option to Enable History. The History area attributes are displayed
Step 23. In the right pane,
check the option to Enable History. The History area attributes are displayed
Step 23. In the right pane,
check the option to Enable History. The History area attributes are displayed
Step 23. In the right pane,
check the option to Enable History. The History area attributes are displayed
Step 23. In the right pane,
check the option to Enable History. The History area attributes are displayed
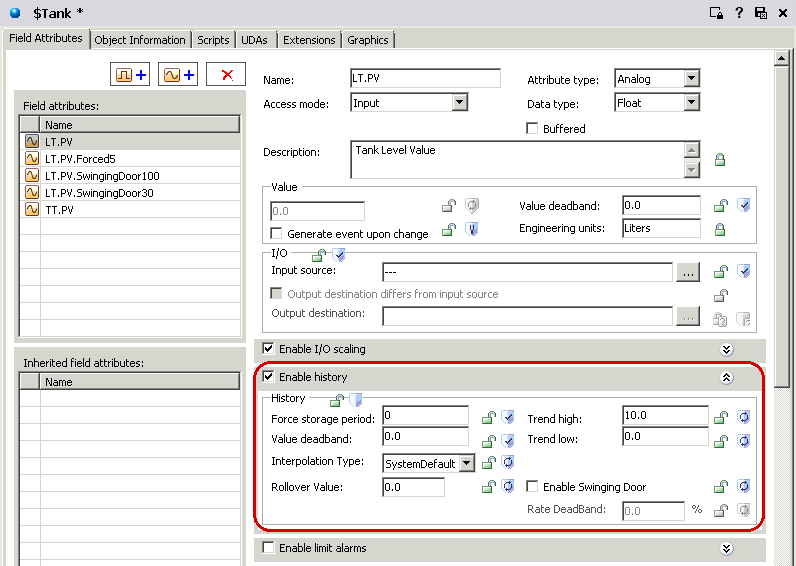
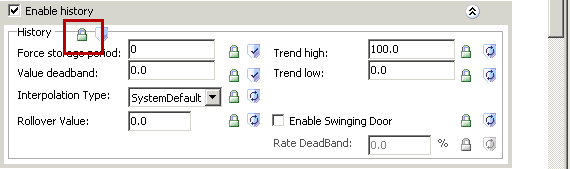
Change the value of Trend high to 100.0 and
leave the other values as default.
Step 24.Click the History area lock
icon.
Change the value of Trend high to 100.0 and
leave the other values as default.
Step 24.Click the History area lock
icon.
Change the value of Trend high to 100.0 and
leave the other values as default.
Step 24.Click the History area lock
icon.
Change the value of Trend high to 100.0 and
leave the other values as default.
Step 24.Click the History area lock
icon.
Change the value of Trend high to 100.0 and
leave the other values as default.
Step 24.Click the History area lock
icon.
Change the value of Trend high to 100.0 and
leave the other values as default.
Step 24.Click the History area lock
icon.
Change the value of Trend high to 100.0 and
leave the other values as default.
Step 24.Click the History area lock
icon.
Change the value of Trend high to 100.0 and leave the other values as default.
Step 24.Click the History area lock icon.
Step 25. In the Field attributes list, select LT.PV.Forced5.
Step 26. In the right pane, configure
the History area as follows:
Enable history checked
Forced storage period: 5000
Trend high: 100.0
Leave the other values as default.
Step 27. Click the History area lock icon.
Step 25. In the Field attributes list, select LT.PV.Forced5.
Step 26. In the right pane, configure
the History area as follows:
Enable history checked
Forced storage period: 5000
Trend high: 100.0
Leave the other values as default.
Step 27. Click the History area lock icon.
Step 25. In the Field attributes list, select LT.PV.Forced5.
Step 26. In the right pane, configure
the History area as follows:
Enable history checked
Forced storage period: 5000
Trend high: 100.0
Leave the other values as default.
Step 27. Click the History area lock icon.
Step 25. In the Field attributes list, select LT.PV.Forced5.
Step 26. In the right pane, configure
the History area as follows:
Enable history checked
Forced storage period: 5000
Trend high: 100.0
Leave the other values as default.
Step 27. Click the History area lock icon.
Step 25. In the Field attributes list, select LT.PV.Forced5.
Step 26. In the right pane, configure
the History area as follows:
Enable history checked
Forced storage period: 5000
Trend high: 100.0
Leave the other values as default.
Step 27. Click the History area lock icon.
Step 25. In the Field attributes list, select LT.PV.Forced5.
Step 26. In the right pane, configure
the History area as follows:
Enable history checked
Forced storage period: 5000
Trend high: 100.0
Leave the other values as default.
Step 27. Click the History area lock icon.
Step 25. In the Field attributes list, select LT.PV.Forced5.
Step 26. In the right pane, configure
the History area as follows:
Enable history checked
Forced storage period: 5000
Trend high: 100.0
Leave the other values as default.
Step 27. Click the History area lock icon.
Step 25. In the Field attributes list, select LT.PV.Forced5.
Step 26. In the right pane, configure the History area as follows:
Enable history checked
Forced storage period: 5000
Trend high: 100.0
Leave the other values as default.
Step 27. Click the History area lock icon.
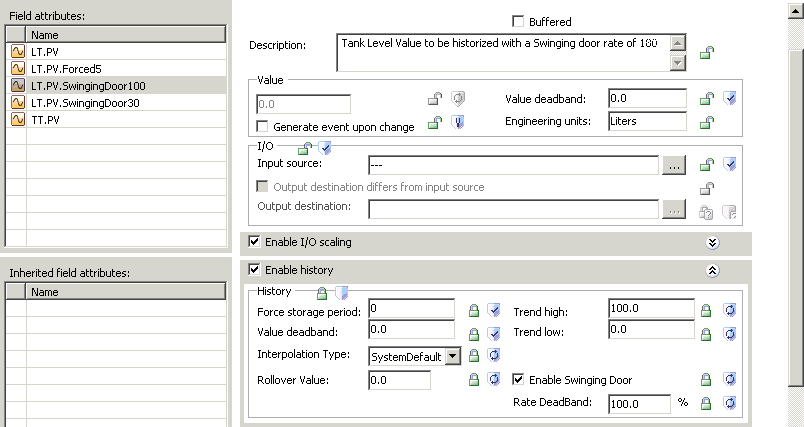
Step 28. In the Field Attributes list,
select LT.PV.SwingingDoor100.
Step 29. In the right pane, configure the History
area as follows:
Enable history checked
Trend high: 100.0
Enable Swinging Door: checked
Rate DeadBand: 100.0
Leave the other values as default.
Step 30. Click the History area lock
icon.
Step 28. In the Field Attributes list, select LT.PV.SwingingDoor100.
Step 29. In the right pane, configure the History area as follows:
Enable history checked
Trend high: 100.0
Enable Swinging Door: checked
Rate DeadBand: 100.0
Leave the other values as default.
Step 30. Click the History area lock icon.
I
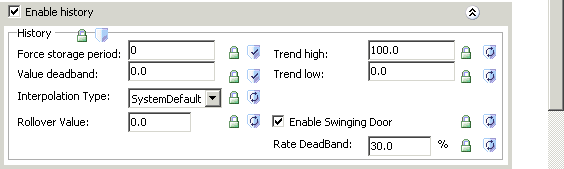
Step 31. In the Field attributes list,
select LT.PV.SwingingDoor30.
Step 32. In the right pane, configure the History
area as follows:
Enable history checked
Trend high: 100.0
Enable Swinging Door: checked
Rate DeadBand: 30.0
Leave the other values as default.
Step 33. Click the History area lock icon.
I
Step 31. In the Field attributes list, select LT.PV.SwingingDoor30.
Step 32. In the right pane, configure the History area as follows:
Enable history checked
Trend high: 100.0
Enable Swinging Door: checked
Rate DeadBand: 30.0
Leave the other values as default.
Step 33. Click the History area lock icon.
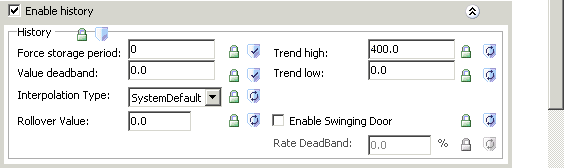
Step 35. In the right pane, check the
option to Enable history.
Step 36. Change the value of Trend high
to 400.0 and leave the other
values as default.
Step 37. Click the History area lock icon.
Step 35. In the right pane, check the
option to Enable history.
Step 36. Change the value of Trend high
to 400.0 and leave the other
values as default.
Step 37. Click the History area lock icon.
Step 35. In the right pane, check the
option to Enable history.
Step 36. Change the value of Trend high
to 400.0 and leave the other
values as default.
Step 37. Click the History area lock icon.
Step 35. In the right pane, check the
option to Enable history.
Step 36. Change the value of Trend high
to 400.0 and leave the other
values as default.
Step 37. Click the History area lock icon.
Step 35. In the right pane, check the
option to Enable history.
Step 36. Change the value of Trend high
to 400.0 and leave the other
values as default.
Step 37. Click the History area lock icon.
Step 35. In the right pane, check the
option to Enable history.
Step 36. Change the value of Trend high
to 400.0 and leave the other
values as default.
Step 37. Click the History area lock icon.
Step 35. In the right pane, check the
option to Enable history.
Step 36. Change the value of Trend high
to 400.0 and leave the other
values as default.
Step 37. Click the History area lock icon.
Step 35. In the right pane, check the option to Enable history.
Step 36. Change the value of Trend high to 400.0 and leave the other values as default.
Step 37. Click the History area lock icon.
Step 38. Save and check in the object.
Step 39. In the Template Toolbox, in the Project
toolset, double-click $Valve to open its editor.
Step 40. In the General tab, in the PV area,
check Historize PV, leaving the default settings.
Step 38. Save and check in the object.
Step 39. In the Template Toolbox, in the Project
toolset, double-click $Valve to open its editor.
Step 40. In the General tab, in the PV area,
check Historize PV, leaving the default settings.
Step 38. Save and check in the object.
Step 39. In the Template Toolbox, in the Project
toolset, double-click $Valve to open its editor.
Step 40. In the General tab, in the PV area,
check Historize PV, leaving the default settings.
Step 38. Save and check in the object.
Step 39. In the Template Toolbox, in the Project
toolset, double-click $Valve to open its editor.
Step 40. In the General tab, in the PV area,
check Historize PV, leaving the default settings.
Step 38. Save and check in the object.
Step 39. In the Template Toolbox, in the Project
toolset, double-click $Valve to open its editor.
Step 40. In the General tab, in the PV area,
check Historize PV, leaving the default settings.
Step 38. Save and check in the object.
Step 39. In the Template Toolbox, in the Project
toolset, double-click $Valve to open its editor.
Step 40. In the General tab, in the PV area,
check Historize PV, leaving the default settings.
Step 38. Save and check in the object.
Step 39. In the Template Toolbox, in the Project
toolset, double-click $Valve to open its editor.
Step 40. In the General tab, in the PV area,
check Historize PV, leaving the default settings.
Step 38. Save and check in the object.
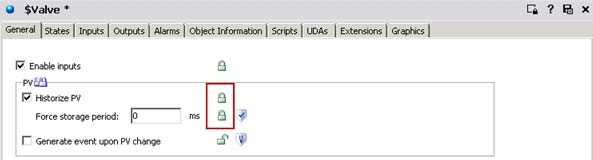
Step 39. In the Template Toolbox, in the Project toolset, double-click $Valve to open its editor.
Step 40. In the General tab, in the PV area, check Historize PV, leaving the default settings.
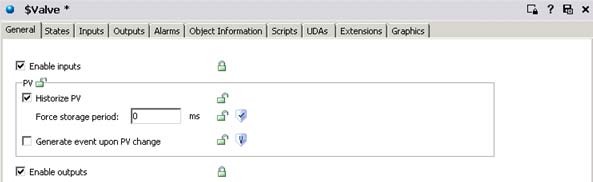
Step 41. Click the lock icons for Historize PV and Force storage period.
Step 41. Click the lock icons for Historize PV and Force storage period.
Step 41. Click the lock icons for Historize PV and Force storage period.
Step 41. Click the lock icons for Historize PV and Force storage period.
Step 41. Click the lock icons for Historize PV and Force storage period.
Step 41. Click the lock icons for Historize PV and Force storage period.
Step 41. Click the lock icons for Historize PV and Force storage period.
Step 41. Click the lock icons for Historize PV and Force storage period.