Topic 10.1.3: Group and User Configuration
- In the Global tab of the Project Explorer, right-click Groups and then click Groups properties on the shortcut menu.

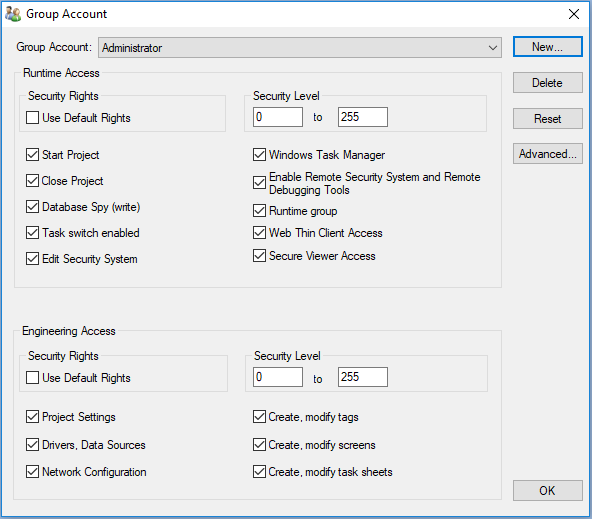
- Group Account: The user group that you are currently configuring.
- New: Creates a new group. In the New Group Account dialog, type the name of the new group and then click OK.
- Delete: Deletes the currently selected group.
- Reset: Resets the privileges of the currently selected group to match the (Default Rights) group.
- Runtime Access:
- The specific rights that a member of the group has when they use a project thin client to access your project during run time:
- Security Rights: Locks the run-time privileges of the currently selected group to those configured for the (Default Rights) groupSecurity Level.
- Access Level: The range of access levels that this group may access in the project.
- Start Project: Members of the group may run the project.
- Close Project: Members of the group may stop the project.
- Database Spy (write): Members of the group may write values to the project database using the Database Spy window.
- Task switch enabled: Members of the group may switch away from the project runtime client to another Windows task.
- Edit Security System: Members of the group may make changes to the project security system during run time.
- Windows Task Manager: Members of the group may open the Windows Task Manager.
- Enable Remote Security System and Remote Debugging Tools: Members of the group may:
- Configure the security system in another project (running in Distributed - Client mode) in order to use the settings in the current project (running in Distributed - Server mode);
- Configure a TCP/IP Client worksheet in another project in order to connect it to the current project; and
- Use Remote Database Spy and Remote LogWin to debug the project while it is running on remote station.
- Runtime group: If this option is selected, the group will be available for new users created during run time
- Web Thin Client Access: Members of the group may use a web thin client to connect to the project runtime server.
- Secure Viewer Access: Members of the group may use a Secure Viewer thin client to connect to the project runtime server.
- Engineering Access
- The specific rights that a member of the group has when they use the project development software to open and edit your project:
- Security Rights: Locks the development privileges of the currently selected group to those configured for the (Default Rights) group. If changes are made to the (Default Rights) group, they also apply to this group.
- Security Level: The range of access levels that this group may access in the development application.
- Project Settings: Members of the group may modify the project settings and the Mobile Access configuration.
- Drivers, Data Sources: Members of the group may create, modify device drivers and external data sources.
- Network Configuration: Members of the group may create, modify TCP/IP Client worksheets.
- Create, modify tags: Members of the group may create, modify project tags.
- Create, modify screens: Members of the group may create, modify project screens.
- Create, modify task sheets: Members of the group may create, modify task worksheets.
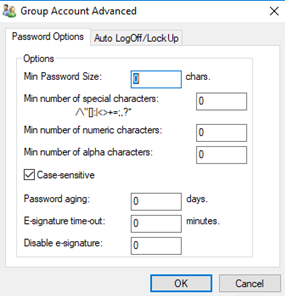
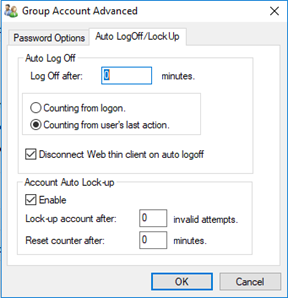
- Advanced: Opens the Group Account Advanced dialog.


- In that you can define Min password size, Min number of special characters, Min number of numeric characters, Min number of alpha characters, Case-sensitive ( passwords created with both upper and lowercase characters must be entered the same way by the user) ,Password aging(The number of days that a password can be used before it expires),E-signature time-out(Timeout period (in minutes) of the E-Sign dialog box for all users in this group),Disable e-signature(When the value in this box is TRUE (non-zero), users in this group can ignore the e-signature requirement on any screen objects) ,Log Off after Number of (Counting from logon or Counting from user's last action ), Disconnect Web Thin Client on auto logoff, Auto Lock-up Enable , Lock up account after(Maximum number of times a user can try to log on to an account),Reset counter after(Defines how long after an invalid log-on attempt the project will wait (in minutes) until it resets the log-on attempts counter).
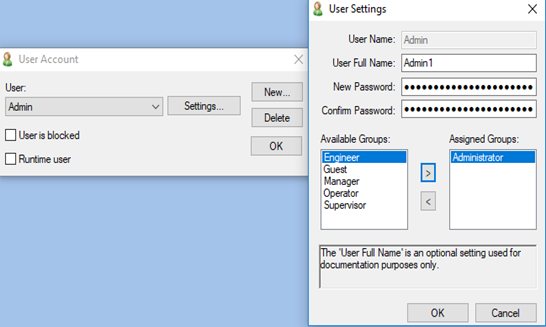
- To create and maintain accounts for project users, click the Users button on the Security System dialog.

- Create a new user: click New to open the New User Account dialog.
- Delete a user: click the User combo-box button, select the user name from list, and then click Delete.
- User Full Name text box: Type the user's full name.
- New Password text box: Type the user's password.
- Confirm Password text box: Re-type the user's password.
- Block User: Block the user from logging onto the project at all, select User is blocked. This allows you to disable a user account without deleting it.
Runtime user: If this option is not selected, the user cannot be changed, blocked, or removed except through this dialog. This allows you to protect certain users.
Last modified: Friday, 12 July 2019, 1:45 PM
