Lab 30: Alarm Configuration
Step 1: In the Insert tab of the Ribbon select Alarm from the Task Worksheets group.

Step 2: The ALARM001 tab is opened in the Workspace.
Step 3: Configure the header of the ALARM001 worksheet as shown below,

The Activation FG color should be red.
Step 4:Configure the body of the ALARM001 worksheet as shown below.

Step 5: Save and close alarm worksheet ALARM001.
Step 6: In the Insert tab of the Ribbon select Alarm from the Task Worksheets group.

Step 7: The ALARM002 tab is opened in the Workspace.
Step 8: Configure the header of the ALARM002 worksheet as shown below,

The FG color should be yellow.
Step 9: Configure the body of the ALARM002 worksheet as shown below.

Step 10: Save and close alarm worksheet ALARM002.
Step 11:Open the Project Tags Datasheet View and create the tags as shown below.

Step 12: Open the Template screen.
Step 13: Click the Application button and click Save As on the Application menu. The Save As dialog box is opened.
Step 14: In the File name field, enter Alarms.
Step 15: Click Save. The Save As dialog box is closed.
Step 16: In the Graphics tab of the Ribbon, select Alarm/Event under Data Objects.

Step 17: Click and drag on the screen to shape the object as shown below.

Step 18: Double-click on the object to open the properties.

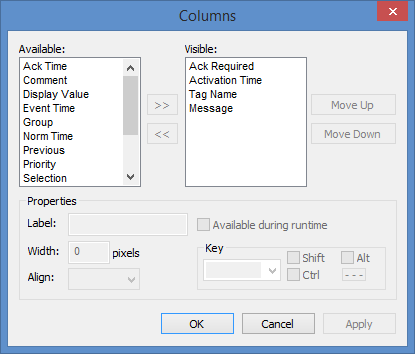
Step 19: Click on Columns. The Columns settings is opened.

Step 20: Configure the Visible columns as shown below.

Step 21: Select OK to close the Columns settings.
Step 22: Click on Filters. The Filters settings is opened.

Step 23: Configure the fields called Group and Selection as shown below.

Step 24: Select OK to close the Filters settings.
Step 25: In the Graphics tab of the Ribbon, select Text under Active Objects.
Step 26: Click on the screen and enter Filter by Alarm Group: as shown below.

Step 27: In the Graphics tab of the Ribbon, select Combo Box under Active Objects.
Step 28: Click and drag on the screen to shape the object as shown below.

Step 29: Open the Object Properties of the Combo Box and set the field called Position to the tag called iAlrGroup as shown below.

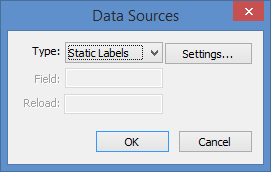
Step 30: Click Data Sources to open the Combo Box data sources settings as shown below.

Step 31: Click Settings and set the Static Labels as shown below.

Make sure that the first line is a blank line.
Step 32: Click Ok to close the Static Labels settings.
Step 33: Click Ok to close the Data Source settings.
Step 34: In the Graphics tab of the Ribbon, select Text under Active Objects.
Step 35: Click on the screen and enter Filter by Tank: as shown below.

Step 36: In the Graphics tab of the Ribbon, select Combo Box under Active Objects.
Step 37: Click and drag on the screen to shape the object as shown below.

Step 38: Open the Object Properties of the Combo Box and set the field called Label to the tag called sAlrSelection as shown below.

Step 39: Click Data Sources to open the Combo Box data sources settings as shown below.

Step 40: Click Settings and set the Static Labels as shown below.

Make sure that the first line is a blank line.
Step 41: Click Ok to close the Static Labels settings.
Step 42: Click Ok to close the Data Source settings.
Step 43: In the Graphics tab of the Ribbon, select Button under Active Objects.
Step 44: on the screen and draw the button as shown below.

Step 45: Open the Object Properties of the Button and set the field called Caption as shown below.

Step 46: Click Command to open the Command object properties and set them as shown below.

Step 47: In the Graphics tab of the Ribbon, select Button under Active Objects.
Step 48: Click on the screen and draw the button as shown below.

Step 49: Open the Object Properties of the Button and set the field called Caption as shown below.

Step 50: Click Command to open the Command object properties and set them as shown below.

Step 51: In the Graphics tab of the Ribbon, select Alarm/Event under Data Objects.

Step 52: Click and drag on the screen to shape the object as shown below.

Step 53: Double-click on the object to open the properties.

Step 54: In Type, configure Alarm History.
Step 55: Click on Columns. The Columns settings is opened.

Step 56: Configure the Visible columns as shown below.

Step 57: Select OK to close the Columns settings.
Step 58:Click on Advanced. The Advanced settings is opened.

Step 59: Configure the Run-time Dialog Triggers section as shown below.

Step 60: Select OK to close the Advanced settings.
Step 61: In the Graphics tab of the Ribbon, select Button under Active Objects.
Step 62: Click on the screen and draw the button as shown below.

Step 63: Open the Object Properties of the Button and set the field called Caption as shown below.

Step 64: Click Command to open the Command object properties and set them as shown below.

Step 65: When you are done the Alarm screen should look similar to the following.

Step 66: Save your changes and close the ALARMS screen.
Step 67:If your runtime is on a remote machine, then use the Remote Management tools on the Home tab of the Ribbon to download your project to the remote machine.
Step 68: Start the runtime and use the tank valves to fill the tanks to create some alarms.
Step 69: Open the ALARMS screen and verify that it is displaying the expected alarms.
