Topic 2.1.2: Product-Based Installation
Step 1: Locate the installation folder on the MES installation media that has been loaded or copied to the local node.
Step 2: Run the Setup.exe file in the root directory of the installation folder.
If a previous release of MES is already installed on the node, a message appears that identifies the version and that the product will be updated.

Step 3: Click OK.
If the required release of .NET Framework is not installed, you are prompted to install it. Click Yes to install the required release of .NET Framework. At the conclusion of the .NET
Framework installation, you might be prompted to restart the system. If so, restart the system and then rerun the MES Setup tool to continue with the MES installation.
Otherwise, the Setup tool opens and the Welcome to MES Setup message appears.
Step 4: Click Next.
The End User License Agreement (EULA) appears.
Step 5: Use the options to read the general EULA content and the specific schedules for each of the software components available in the installation software.
You can use the controls above the license agreement box to print the agreement or adjust how it is displayed.
Step 6: To continue with the installation, select the I have read and accept the terms ... option, then click Agree.
The roles by which the MES components are grouped appears. Information about the highlighted role appears in the description box on the right. For more information about these roles and which products and components are installed with them, refer to "Topic 2.1.3: Role-Based Installation."

Step 7: Select the roles whose products and components you want to install on the local node and click Next.
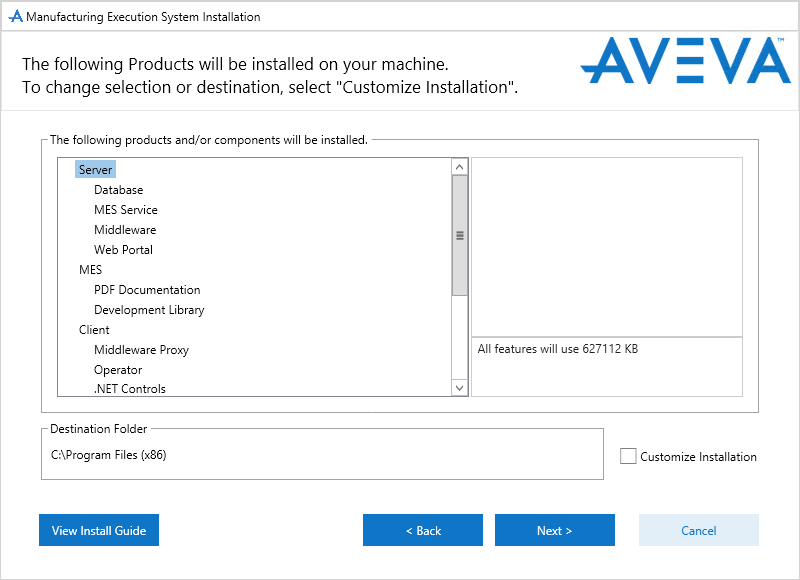
A list of the products and components that will be installed appears.

Step 8: Do one of the following, depending on whether you want to customize which products and components will be installed or change the destination install folder:
To install the default sets of products and components for the roles you selected and use the default install destination folder (C:\Program Files (x86)), leave the Customize Installation check box cleared and click Next.
A list of the prerequisite software that must be installed on the node prior to performing the MES installation appears. Go to step 11.
To customize the sets of products and components for the roles you selected, or to change the install destination folder, select the Customize Installation check box and click Next.
The list of products and components appears. The products and components are selected based on the roles selected in step 7. Information about the selected component appears in the description box on the right. Go to step 9.

Note: To install the License Server and Manager components or the Intelligence Server, Intelligence Model Builder, and Intelligence Data Adapters components as part of the MES installation, you have to choose the Customize Installation option and then manually select these components.
Note: Intelligence and the MES Intelligence Reports component must be installed on the same node as SQL Server Reporting Services (SSRS). Otherwise, the Quality Characteristic Detail report SPC Chart will not work
Step 9: To change the install destination folder, click the Browse button and then navigate to and select the desired folder.
Step 10: To change the products or components to be installed, select the check boxes of only those products or components that you want to install and click Next.
MES is ready to be installed. A list of the products and components that will be installed appears. Also, any prerequisite software that the MES installation can install is listed under Prerequisites:

Step 10: Click Install.
When the installation is finished, you are prompted to configure products and components that require configuration before they can be used.

Step 11: To start the Configurator, click Configure.
