Lab 18: Configuring Application Redundancy
- Configure
Windows network connections
Note: The following configuration needs to be done on BOTH computers.
Open Windows Network Connections by double-clicking on Start / Control Panel / Network Connections.
The Network Connections window appears.
Rename network connections as follows:
- Local Area Connection to ArchestrA
- Local Area Connection 2 to RMC
- This is an optional step that enables you to easily
identify each connection in this class environment.
rom the Advanced menu, select Advanced Settings.
- In the Advanced Settings dialog box, Adapters and Bindings tab, make sure that the ArchestrA connection is listed before the RMC connection and then click the OK button to close the dialog box.Right-click on the RMC connection and select Properties.
- In the RMC Properties dialog box, General tab, select the Internet Protocol (TCP/IP) item and click the Properties button.

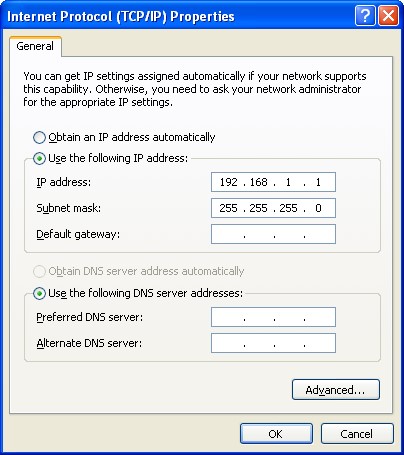
At the Internet Protocol (TCP/IP) Properties dialog box select the Use the following IP address option and assign an IP address in a different subnet than the ArchestrA connection.
Important! The IP address for the RMC connection must be different on each computer but in the same subnet, and on a different subnet than the ArchestrA node.
Note: In this example the first computer will have an IP address of 192.168.1.1 and the second computer will have an IP address of 192.168.1.2. Both will be have a subnet mask of 255.255.255.0.

Click the Advanced
button to continue.
In the Advanced
TCP/IP Settings dialog box, select the DNS tab.
Uncheck the Register
this connection’s address in DNS box.
Click the OK button
to close the Advanced TCP/IP Settings dialog box.
Click the Advanced button to continue.
In the Advanced TCP/IP Settings dialog box, select the DNS tab.
Uncheck the Register this connection’s address in DNS box.
Click the OK button to close the Advanced TCP/IP Settings dialog box.

Click the OK button
to close the Internet Protocol (TCP/IP)
Properties dialog box.
Click the Close
button to close the RMC Properties dialog box.
Configure the
Galaxy for Redundancy
Undeploy the GRPlatform
object.
Double-click the GRPlatform instance to open its configuration editor.
In
the Redundancy panel, Redundancy message
channel IP address
field, enter the IP
address assigned to the RMC connection you used for the first computer in step 7.
In this example
the first computer has an IP address
of 192.168.1.1
Click the OK button to close the Internet Protocol (TCP/IP) Properties dialog box.
Click the Close button to close the RMC Properties dialog box.
Configure the Galaxy for Redundancy
Undeploy the GRPlatform object.
Double-click the GRPlatform instance to open its configuration editor.
In the Redundancy panel, Redundancy message channel IP address field, enter the IP address assigned to the RMC connection you used for the first computer in step 7.
In this example the first computer has an IP address of 192.168.1.1
Click the Save
and Close button and check in the object.
Create a new instance of the $tWinPlatform template named Platform_001.
Assign the new Platform_001
instance to the ControlSystem area.
Click the Save and Close button and check in the object.
Create a new instance of the $tWinPlatform template named Platform_001.
Assign the new Platform_001 instance to the ControlSystem area.

Double-click the Platform_001 instance to open its configuration editor.
In the Network address field, enter the name of second computer.
In the Redundancy panel, Redundancy message channel IP address field, enter the IP address assigned to the RMC connection you used for the second computer in step 7.
In this example the second computer has an IP address of 192.168.1.2
- Click the Save and Close button and check in the object.
- Double-click the AppEngine instance to open its configuration editor.
- Select the Redundancy tab and configure the object as follows:
- Enable redundancy: checked

- Click the Save and Close button and check in the object.
- In Deployment view, assign the automatically created AppEngine (Backup) object to the Platform_001 instance.

- Test
Redundancy
- Deploy the galaxy by right-clicking the name of the
galaxy and selecting Deploy.
- Open Object Viewer
by right-clicking the AppEngine
instance and selecting
View in Object Viewer.
- Load your saved Watch List.
- Right-click in the Watch List (bottom section
of Object Viewer) and select Add Watch Window to add a new tab to the
watch list.
- Right-click in the Watch List (bottom section
of Object Viewer) and select Rename Tab to rename the watch list to Redundancy.
- Using the watch list created in Lab
5, add a new watch window named Redundancy
with the following attributes
from the AppEngine instance:
- Host
- Redundancy.Identity
- Redundancy.Status
- Redundancy.PartnerPlatform
- Redundancy.PartnerStatus
- Redundancy.FailoverOccurred
- Redundancy.ForceFailoverCmd
- Your data should look similar to the following:
- Deploy the galaxy by right-clicking the name of the galaxy and selecting Deploy.
- Open Object Viewer by right-clicking the AppEngine instance and selecting View in Object Viewer.
- Load your saved Watch List.
- Right-click in the Watch List (bottom section of Object Viewer) and select Add Watch Window to add a new tab to the watch list.
- Right-click in the Watch List (bottom section of Object Viewer) and select Rename Tab to rename the watch list to Redundancy.
- Using the watch list created in Lab 5, add a new watch window named Redundancy with the following attributes from the AppEngine instance:
- Host
- Redundancy.Identity
- Redundancy.Status
- Redundancy.PartnerPlatform
- Redundancy.PartnerStatus
- Redundancy.FailoverOccurred
- Redundancy.ForceFailoverCmd
- Your data should look similar to the following:

Force a failover to the second computer by writing true to the ForceFailoverCmd attribute of the AppEngine.
Last modified: Tuesday, 9 July 2019, 11:56 PM
