Lab 40: Configuring and using Web Thin Clients
- Configure the Project Web Settings
Step 1: In the Project tab of the Ribbon under the Web group, select Web.

Step 2: Project Settings window will be displayed.

Step 3: Enable Auto Screen Scaling option.
Step 4: Click OK.
- Create HTML Pages for the Screens

Step 6:The following message may be displayed:

Step 7: Click on Yes to enable the TCP/IP Server task.
Step 8: If IP Security is not enabled, the following message will be displayed:

Step 9: Click on OK
Step 10: If your runtime is on a remote machine, then use the Remote Management tools on the Home tab of the Ribbon to download your project to the remote machine.
Step 11: Start the runtime.
- Configuring IIS
Step 12: Open the Windows Control Panel.
Step 13: Open Administrative Tools.
Step 14: Open Internet Information Services (IIS) Manager.

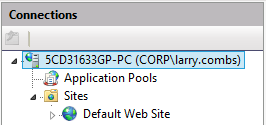
Step 15: On the left of the IIS Manager, in the Connections group, click the chevron to the left of your computer name to expand it. Then click the chevron to the left of Sites to expand the web sites. Then select the Default Web Site.

Step 16:On the right of the IIS Manager, in the Actions group, click Basic Settings.

The Edit Site dialog box is opened.

Step 17: In the Physical path field, enter C:\HMI\TrainingProject.
![]()
Step 18:Click OK to close the Edit Site dialog box.
Step 19:On the left of the IIS Manager, in the Connections group, select the name of your computer.

Step 20: In the center of the IIS Manager, in the IIS group of icons, double-click MIME Types.

The list of defined MIME types is opened. #
Step 21: On the right of the IIS Manager, in the Actions group, click Add.

The Add MIME Type dialog box is opened.

Step 22: In the File name extension and MIME type fields, enter .app and application/octetstream, respectively.

Step 23: Click OK to close the Add MIME Type dialog box.
Step 24: Repeat Steps 21-23 for each of the following file extensions.
• .bin
• .csv
• .gis
• .html
• .ico
• .ini
• .lst
• .rtgis
• .scc
• .scr
• .sg
• .stmp
• .tra
• .trn
• .txt
Disregard any file extensions that may already be defined.
Step 25: On the left of the IIS Manager, in the Connections group, select the name of your computer.

Step 26: On the right of the IIS Manager, in the Actions group, click Restart.

Step 27: Close the Internet Information Services (IIS) Manager.
- Configure Windows folder security
Step 28:Open Windows File Explorer and navigate to C:\HMI. Right-click on your TrainingProject project folder and click Properties. The TrainingProject Properties dialog box is opened.

Step 29: Click the tab called Security. The TrainingProject security properties are shown.

Step 30: Click Edit. The Permissions for TrainingProject dialog box is opened.

Step 31: Click Add. The Select Users or Groups dialog box is opened.

Step 32: In the Enter the object names to select field, enter IUSR and IIS_IUSRS, separating each by a semicolon.

Step 33: Click Ok to close the Select Users or Groups dialog box. The two built-in security principles called IUSR and IIS_IUSRS are added to the Group or user names list box.

Step 34: Click Ok to close the Permissions for TrainingProject dialog box.
Step 35:Click Ok to close the TrainingProject Properties dialog box. Verification and Test
Step 36: Open Internet Explorer on some machine (could be your development machine).
Step 37: In the URL field, enter http://<host-name-or-IP-address>/web/startup.html, where <host-name-or-IP-address> is the name or IP address of your runtime machine.
Step 38: After all files are downloaded, the application will open in the browser.
