Lab 17 – Configuring Redundancy with Historian Server
Configure Redundancy
Each Historian Server has a parameter that determines the Historian Server partner. First, you will configure this parameter in both Historian Servers.
Step 1. In the System Management Console, expand Historian\Historian Group\[Primary Historian Server node name]\Configuration Editor\System Configuration and select Parameters.
Step 2. In the right pane, double-click the HistorianPartner parameter. The HistorianPartner Properties dialog box opens.
Step 3. In the Value field, enter the name of your partner Historian Server.
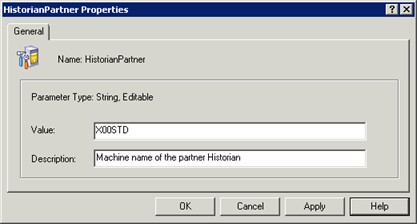
Step 4. Click OK.
A Wonderware Historian confirmation message appears.
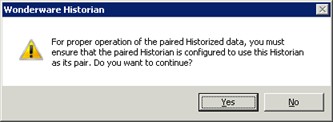
Step 5. Click Yes.
Step 6.Right-click Parameters and select Commit Pending Changes.
Step 7. The Commit Pending Changes - Confirmation dialog box appears.
Step 8. Click Commit.
Step 9. In the System Management Console, expand Historian\Historian Group\[Partner Historian Server node name]\Configuration Editor\System Configuration\Parameters.
Step 10. In the right pane, double-click HistorianPartner.
Step 11. In the HistorianPartner Properties dialog box, in the Value field, enter the name of your primary Historian Server.
Step 12. Click OK.
The Wonderware Historian confirmation dialog box appears.
Step 13. Click Yes.
Step 14. Right-click Parameters and select Commit Pending Changes.
Step 15. The Commit Pending Changes - Confirmation dialog box appears.
Step 16. Click Commit.
Step 17. Go to the ArchestrA IDE and right-click the AppEngine1 instance.
Select View in Object Viewer.
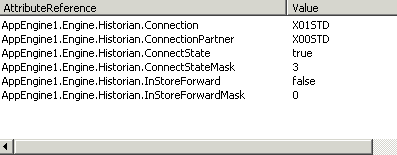
Step 19. Find the following attributes and add them to the Watch list: Engine.Historian.Connection
- Engine.Historian.ConnectionPartner
- Engine.Historian.ConnectState
- Engine.HistorianConnectStateMask
- Engine.Historian.InStoreForward
- Engine.Historian.InStoreForwardMask
Open Historian Client Trend
Now you will configure the Historian Client Trend control to trend a couple of historized tags.
Step 20. Click Start/All Programs/Wonderware/Historian Client and select Trend.
Step 21. If this is the first time you open the Historian Client Trend, the Server List Configuration
dialog box opens.
In the Server field, enter the name of your primary Historian Server and check the box to Use Integrated Security.
Step 22. Click Add.
The Historian Server now appears listed in the Server List.
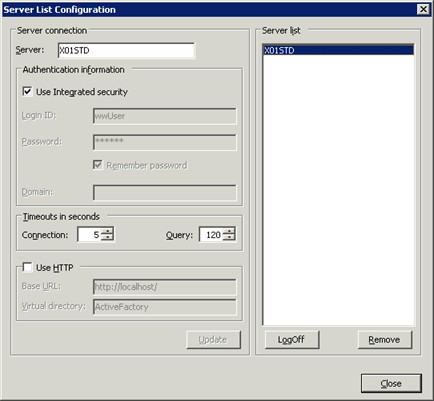
Step 24. Click Close.
On the left side of the Historian Client Trend, the Tag Picker automatically populates with the tag data from the primary Historian Server.
Step 25. In the bottom pane of the Tag Picker, where the Tags are, double-click M100.LT.PV and
M200.TT.PV to add them to the chart area.
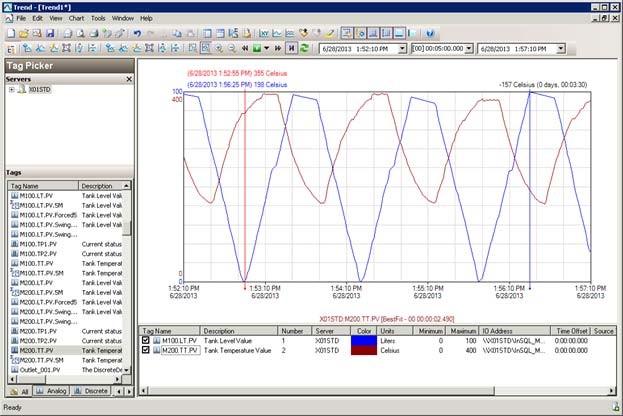
Step 25. In the bottom pane of the trend area, in the Tags list, expand the IO Address column so you can see the full IO address for the tags.

Step 26. You are going to monitor this column very closely in the next part of the lab, because here you will see the I/O address switching between redundant partners after a disconnection.
Step 27. In the time toolbar, click the Live Mode button.

The chart will start automatically refreshing to display the latest historized data.
Test Redundancy
Now you will disconnect your primary Historian Server from the network, and then you will be able to verify how the Historian Client Trend switches to the partner Historian Server to get data.
Step 28. Take note of the current I/O address for both tags in the trend.
Step 29. With the help of your instructor, disconnect your primary Historian Server from the network.
Step 30. In the Tags list, monitor the IO Address column value.
Step 31. The chart will stop updating for a few seconds, but shortly you should see the IO Address column updating to the partner Historian Server and the data displaying normally in your chart.

Step 32. The attributes in Object Viewer also update as follows:
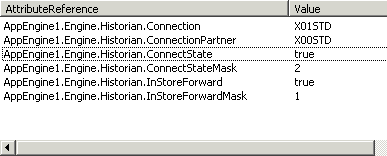
The new state should be ConnectStateMask=2, meaning the engine is connected to the partner Historian Server and InStoreForwardMask=1, meaning the engine is in Store-and- Forward mode with the Primary Historian Server, from which it is disconnected.
Step 33. With the help of your instructor, reconnect your primary Historian Server and verify Trend does not switch back.