Lab 3.4– Deploy Galaxy Changes
Deploy Galaxy Changes
In the previous
steps, you configured a series of Galaxy attributes to be historized; however,
Historian is not yet aware
of the new attributes to be historized. The final configuration step is done automatically by the deployment process.
First, you will monitor the current status of your Historian to verify
how many tags are being historized. Then, after deployment, you will monitor
Historian again to compare the new status.
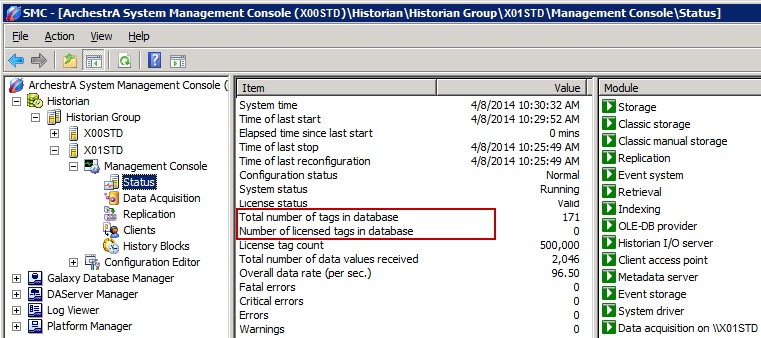
Step 75. In the SMC, in the left pane, select
Status.
Step 76. In the right pane, look for
the following items and take note of their values:
Deploy Galaxy Changes
In the previous steps, you configured a series of Galaxy attributes to be historized; however, Historian is not yet aware of the new attributes to be historized. The final configuration step is done automatically by the deployment process.
First, you will monitor the current status of your Historian to verify how many tags are being historized. Then, after deployment, you will monitor Historian again to compare the new status.
Step 75. In the SMC, in the left pane, select Status.
Step 76. In the right pane, look for the following items and take note of their values:
Note: This value will change depending on whether your installation
was migrated from a previous version or if it is a new installation.
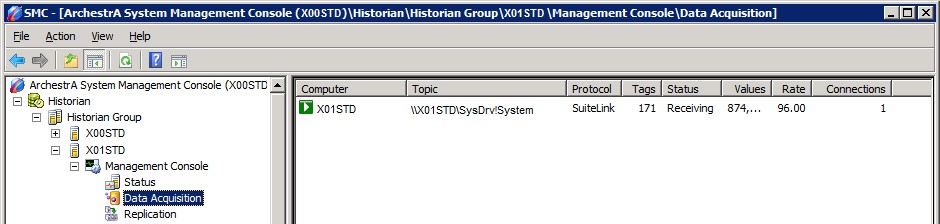
Step 77. Under Management Console, select Data Acquisition.
Notice the only existing
topic is SysDrv!System, which
corresponds to the System driver module
collecting key variables and system performance counters from the Historian
node.
Note: This value will change depending on whether your installation was migrated from a previous version or if it is a new installation.
Step 77. Under Management Console, select Data Acquisition.
Notice the only existing topic is SysDrv!System, which corresponds to the System driver module collecting key variables and system performance counters from the Historian node.
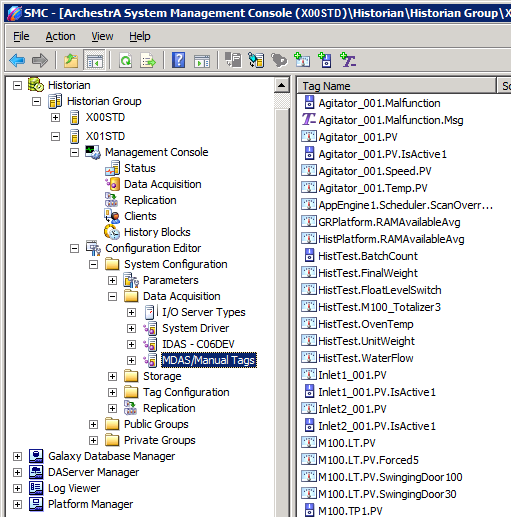
Step 78. Expand Configuration Editor\System Configuration\Data Acquisition and select MDAS/ Manual Tags. Verify it is empty now, but
after deployment, you will see the new historized tags here.
Step 78. Expand Configuration Editor\System Configuration\Data Acquisition and select MDAS/ Manual Tags. Verify it is empty now, but after deployment, you will see the new historized tags here.

I
I
Step 79.In the ArchestrA IDE, in the Deployment
view, right-click TrainingGalaxy and select Deploy.
Step 79.In the ArchestrA IDE, in the Deployment view, right-click TrainingGalaxy and select Deploy.
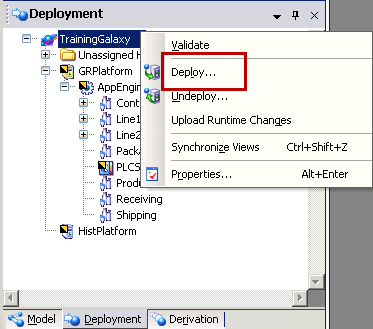
The Deploy dialog box appears
The Deploy dialog box appears
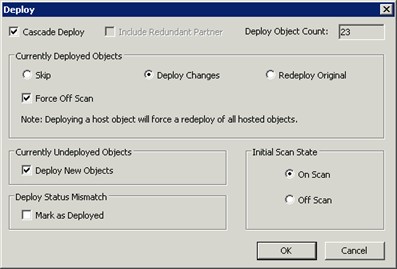
Kee
Step 80. Keep the default options and
click OK.
The Deploy dialog box appears and displays the progress of the deployment. This may take a
few moments.
Note: It
is important to review the messages in the Deploy
dialog box to make sure the
operation finishes successfully.
Step 81. When the progress displays 100% completed, click Close.
Step 82. In the SMC, in the left
pane, select Status.
Step 83. Confirm the Total number
of tags in database and
the Number of licensed
tags in database items
changed their value.
Step 84. Under Management
Console, select Data Acquisition
Kee
Step 80. Keep the default options and click OK.
The Deploy dialog box appears and displays the progress of the deployment. This may take a few moments.
Note: It is important to review the messages in the Deploy dialog box to make sure the operation finishes successfully.
Step 81. When the progress displays 100% completed, click Close.
Step 82. In the SMC, in the left pane, select Status.
Step 83. Confirm the Total number of tags in database and the Number of licensed tags in database items changed their value.
Step 84. Under Management Console, select Data Acquisition
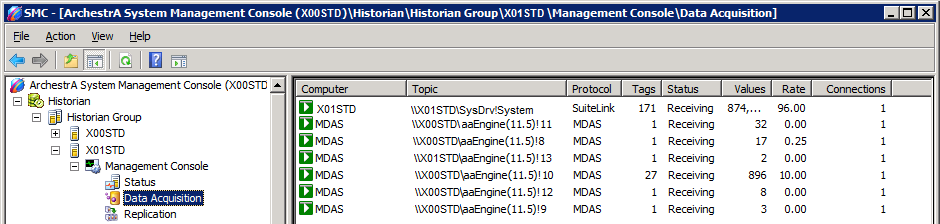
Notice that now you have
additional engines also reporting data to Historian, your
AppEngine1 and both platforms GRPlatform and HistPlatform.
Step 85. Select MDAS/Manual Tags.
Verify your historized
attributes are listed here under Tag Name.
Notice that now you have additional engines also reporting data to Historian, your
AppEngine1 and both platforms GRPlatform and HistPlatform.
Step 85. Select MDAS/Manual Tags. Verify your historized attributes are listed here under Tag Name.